Tampilkan postingan dengan label computer Repairs. Tampilkan semua postingan

Jumat, 27 November 2009

How to download Toshiba drivers

There is no doubt that the world is now going mobile, every body wants something that is handy and easy to carry around, and this development has triggered innovations and recent technological advancement.
One can buy a laptop and no longer the desktop we all use to have in our houses. There is no problem with the advancement in technology when it comes to laptops and small PDA’s, the problem now is how easy these devices to be maintained are and by what category of human beings. Its not just buying laptop but being able to maintain it and off cause fix it when its faulty.
In this article I will be continueing on my series how to download drivers, I have written on how to download HP drivers,Dell drivers,Acer drivers and now am going to be sharing with you how to download Toshiba drivers, especially for your laptops. Firstly I like to let you know that when ever you are looking for any driver for any device, the first place to check is the device manufacturers website. Don’t be deceived into believing that you will find a better driver outside the manufacturers website. Am not also rulling off the fact that you can get drivers from other site.
In this article I will be showing you step by step guid on how to download Toshiba drivers from Toshiba support website. If you are ready lets go there.
1. go to Toshiba drivers download page http://www.csd.toshiba.com/cgi-bin/tais/support/jsp/home.jsp. when the site opens click on download on the top of the site.
2. if you are downloading drivers for laptop click on laptops when the download page opens.
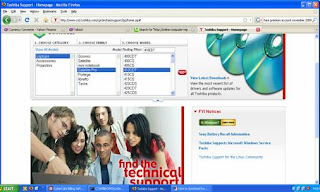
3. select the category in the choose family field,
4. all the models for that category will be listed in the last pane of the search box, select you laptop model in that box and click on Go.
When you click on the GO button, the site will load and display all the drivers for all the operating systems. Now you have to filter the result by some criteria’s like your own installed operating system.


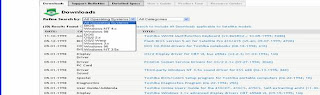
Where you see refine search by, click the drop down list and select your installed operating system. The site will load and display links to all the drivers tof your Toshiba laptop. Just click on each link of the driver you need and it will take you to the download link for that driver, as soon as you have downloaded the driver click on back button on your browser to take you back to the driver list.
Note: to make your search easier you have to know the devices that are in your laptop e.g. does your laptop have a Bluetooth device, wifi etc. this will make your download much easier.

If you follow through this simple steps you should see all the drivers for your laptop,

For more on drivers download please read other articles on how to download drivers for your devices.
youcan ask you question by commenting on the post or send a mail to solutionprovider2000@gmail.com or visit http://online-computer-repairs.blogspot.com. You can subscribe to our feed and stay current with more computer repair articles that will help you keep your computer safe and secured

Rabu, 08 April 2009

How to Download Acer drivers

One of the problems people get with Acer computers is drivers, how? They find it difficult to download drivers if they need to especially for the laptop computers. After formatting there Acer Laptop downloading the drivers takes they a lot of time.
A lot of my readers and clients have been complaining obout drivers and how to download them so I decided to write how to download all the major computer manufacturers drivers. I have written how to download dell drivers, also how to download HP drivers .

And now it’s how to download Acer drivers. I will always say this, it’s only the manufacturer of a product that can give you the correct drivers for his product, so when never you need a driver for any product just go to the manufacturer’s website, and you will find it.

To download Acer drivers. Open Acer Europe drivers and support site, select the product category that your computer Is e.g Acer travelmate, Acer Extensa, select your product model and it will load the product drivers and utility download page.
Click on drivers and utilities a pop menu will open click on the driver you want and it will load and start downloading.

Click on empowering technology and utilities to download Acer empowering technology.

Before you start downloading you must know the hardware that you computer came with i.e you should know if your computer came with camera, Bluetooth if it has wireless etc so that you will know the drivers to download.

For more information on drivers download browse our drivers section, you can send your questions to solutionprovider2000@gmail.com or subscribe to our feed and be the first to get our comprehensive articles that will help you keep your computer fast, safe and secured.

Rabu, 25 Februari 2009

How to Install A SATA Hard Drive

Installing a Serial ATA hard disk drive is generally easier than an IDE drive, as it is not necessary to configure jumpers. While physically installing the hard drive in the machine is similar, the SATA drives require fewer configurations and planning. The hard drive has jumpers at the rear of the drive, but they are used for power management and have nothing to do with Master, Slave and Cable Select like the IDE drives use.

Just like any hard drive, there are some precautions you must take when handling a new drive. Before doing anything, read the manufacturer's directions and follow any special instructions that might have been shipped with the HDD.

SATA HDD precautions

• Turn off and unplug the computer.
• Wear an anti-static wrist band or make sure you are properly grounded.
• Do not put stickers or labels on the drive.
• Do not touch the electronics on the hard drive.

Installation process

You can mount the SATA drive in the computer any way you want (flat, upright, and upside down) provided you use the screw mounts on the side or top of the drive. Mount the drive where you will have good air flow and be sure to use the SATA cable that ships with the drive or one that is less than 39 inches, which is within the SATA specification. You can connect the serial cable to a SATA controller on the motherboard, or a controller card if the motherboard does not have an on-board SATA controller.

Next, connect power to the drive using the SATA power connector or the legacy Molex connector. Do not use both at the same time, as this could hurt the hard drive.
SATA hard drive is better than IDE drives both in power consumption and speed. So when next you want to build new computer, consider installing a SATA drive.

For more information on hardware’s and question please comment on the post or send a mail to solutionprovider2000@gmail.com or visit http://online-computer-repairs.blogspot.com. You can subscribe to my feed and stay current with more computer repair articles

Senin, 23 Februari 2009

How to partition your hard drive using FDISK

Have ever seen a computer with one hard drive but when you boot the computer you always see two drives. This is usually done using FDISK. FDISK is a utility that let you partition your hard disk. It is also used to delete a partition

Before you can format your hard drive, you must partition it. Most drives only have a Primary partition, but that partition can be split into an Extended partition which can be further divided into Logical Drives. The C: drive is normally the Primary partition. The logical drives after that can be labeled D: E: F: etc. To partition the drive you'll need a boot disk. This disk (sometimes called a Startup Disk) will contain the FDISK utility. We recommend downloading one from bootdisk.com to match your Operating System, or you can get windows 98 bootable CD. You can use FDISK utility.

Creating Partition

Once the boot disk has been created, insert the disk and reboot. You will eventually wind up at the A:/ prompt. Type FDISK and hit enter. You will be taken to a screen with the following options: or you can use windows 98 bootable CD

1. Create DOS partition or Logical DOS Drive
2. Set active partition
3. Delete Partitions or Logical DOS Drive
4. Display partition information
5. Change current fixed drive

You will choose option one first, then when asked if you want to use the entire amount of space for this you will say Y if you have no intention of partitioning further, or N if you want to create an extended partition (recommended). Your extended partition must take up the remaining space on the disk. You will then be able to create Logical drives.

Your Primary partition should automatically be set as the Active partition. If not, you may need to go to the option 2 to designate it as such.
Keep in mind that there are some restrictions on partition sizes. You may need to partition huge drives into 64 gigs or smaller.

Deleting Partitions

Before creating partitions on older drives, you will have to delete the current partitions. Backup any important data because all data will be lost after deleting a partition. To avoid losing data, you can use non-destructive partitioning software such as Partition Magic--but it's wise to backup just in case.
If you have an NTFS partition on a drive FDISK will not be able to remove it. You'll probably see an error like this NTLDR is missing. Press any key to restart. You can use a utility called delpart.exe to remove the NTFS partition. This is also available at bootdisk.com.

Hard Drive Utilities

Most hard drive manufacturers include partitioning and copying software with the new drives. This will be a disk similar to a boot disk that will provide a graphical interface that walks you through the process of transferring files from one drive to another and partitioning the new disk into the FAT 32 or NTFS format. This is by far the easiest way to go. However, it is still recommended that you know the differences between a Primary, Extended and Logical drive.

For more information and question please comment on the post or send a mail to solutionprovider2000@gmail.com or visit http://online-computer-repairs.blogspot.com. You can subscribe to my feed and stay current with more computer repair articles.

Minggu, 28 Desember 2008

Downgrade laptop from windows vista to windows xp

The introduction of Windows vista has caused numerous challenges in the computer world. From consuming of computer memory, software incompatibility and others including the challenge of trying to downgrade you laptop or desktop from windows vista to windows xp.

Do you have a laptop or desktop that came with windows vista installed on it, and you want to downgrade it back to windows xp.
Did you buy a new hard drive and you want to install windows xp on it and it tells you that no hard drive was found.
In this short article I will be showing you the tricks to downgrade your laptop to windows xp.

Firstly, power your computer and enter the BIOS setup. For most motherboards the button to enter the BIOS is F1, F2, F10, and DELETE
When you turn on your laptop or desktop computer, keep pressing these buttons one will take you to the BIOS. Then inside the BIOS setup utility, locate “Sata native support” under system configuration, and then disable it. Press f10 to save and exit the BIOS setup.

Insert windows xp cd in the cd rom drive. Restart the computer and set it to boot from cd rom drive. For some computer F12, esc, F10 will take you to the boot menu select the cd rom drive and hit the enter button windows xp installation process starts. Install windows xp the way you normally do it.

Post your comments and questions and stay updated with the latest post by subscribing to our feed.

For more information on computer repairs and windows tips and tricks visit online-computer-repairs.blogspot.com

Minggu, 21 Desember 2008

Simple steps to take when your computer refuse to come up

How do you feel, when you press the power button on your computer and it refuse to turn but you shut it down yourself the last time you used it?
It is frustrating especially when it’s not just cable problem.
There are two major problems with computer
1. The computer refuse to power on
2. The computer is on but it does not boot to desktop may be it always restarts on the way.

In this article, I will be showing you series of troubleshooting tips to take when your computer to on.

First, check the AC current, if it is up to your normal AC rating in your country. Over here in Nigeria, I will check if the AC current is up to 230-240 Volts because that is the normal current in Nigeria. If it is, that means it can power the computer.

Check the power pack: check your power pack if it smells burnt that means the power pack is blown. Some power pack has a switch that can switch to either 110 volts or 230 Volts. If that is how your power pack is then switch it to your country’s current rating.
Now you are sure that the power pack is ok and the current can carry your computer.
Make sure the computer is correctly connected. If it is rightly connected, power the computer. If the computer does not come up,

Check the ram: how do you check the ram? Make sure that the power cord is not connected , Open the computer system unit look if your computer has two ram slot, if it does then remove the ram and clean it also dust the slot with a brush, then insert the ram in the other slot. Connect the power cord and power the computer now. If it is not coming up.

Check the Cmos battery: use a tester to check the battery voltage if it reads lower that 2.5 volts then may be it’s the cmos battery. Change the cmos battery, Next check your cmos jumper and make sure that the cmos jumper cap is in pin 1 and 2, and power the computer. If it does not come up then do what is called isolation.

Isolating system component: this means that you have to isolate all the system component and start reinstalling them one after the other. Finally check if your processor is good.

Check Processor: How do you check processor? Uninstall the cooling fan and heat sink, insert the processor without the cooling fan and heat sink, them connect other component and power the computer. Place your hand on the processor to know if the processor is hot or cold if its cold that means the processor is bad and vice versa. If you can replace the processor, then replace it. If you cannot then say good bye to the computer cause it’s gone.

If you have any problem and questions comment on the post for answers or subscribe to my full feeds for update.

For more information on how repairs and configure your computer visit online-computer-repairs.blogspot.com

Sabtu, 13 Desember 2008

6 things to consider when buying a new computer

Is your computer very old?
Is it too slow or the memory is filled up, that you are thinking of buying a new computer?
Before you go to the computer shop, let me show you 6 things to consider when buying a new computer.

1. Computer brand: when buying a new computer the first thing that should come into your mind should be what brand of computer do I want to buy. Brand of a computer is determined by some fact like brand popularity, brand durability and availability of parts in the market.

2. Purpose of the computer: secondly the purpose of the computer should be considered. You have to ask yourself what am I buying this computer for, is it for my personal use, are you using it for DJ, is it for your office, you also have to consider the kind of program that will run on the computer.

3. Facilities available: you also have to consider the facilities that you want the computer to have, facilities like wireless enabled, Bluetooth, camera, card reader etc.

4. Memory Size: you also have to consider the memory of the computer. Computer memory here is the ram and the ram is what runs the applications on the computer so the size of the ram matters a lot, for a brand new computer the ram size is also dependent on the operating system that the computer comes with. If you want to buy a windows vista computer the ram should be like 3GBto 4GB because windows vista needs more memory to run than windows xp, For windows xp 2GBto 3GBwill be ok.

5. Hard disk: the next fact to consider is the size of the hard disk drive. Using large amount of hard disk is the best since some part of the hard disk is assigned to the ram to enable it perform effectively. If you use small size of hard disk and some part is assigned to the ram you will be left with a very small size that makes your computer run slowly. So large hard disk size is the best.


6. Processor speed: another fact to consider is the speed of the processor: you will notice that within the last two years there has been tremendous competition between processor manufacturers. So there are various kinds and types of processor. There are two major processor manufacturers which are Intel and AMD so you have to make your choice based on your research. You have to get a processor with high speed. These are the 6 things to consider when buying a new computer

After considering these facts you are sure to get a good computer when you enter the computer shop.

This article is open for comment and questions
For more on computer repairs visit online-computer-repairs