Tampilkan postingan dengan label Laptop computer. Tampilkan semua postingan

Jumat, 27 November 2009

How to download Toshiba drivers

There is no doubt that the world is now going mobile, every body wants something that is handy and easy to carry around, and this development has triggered innovations and recent technological advancement.
One can buy a laptop and no longer the desktop we all use to have in our houses. There is no problem with the advancement in technology when it comes to laptops and small PDA’s, the problem now is how easy these devices to be maintained are and by what category of human beings. Its not just buying laptop but being able to maintain it and off cause fix it when its faulty.
In this article I will be continueing on my series how to download drivers, I have written on how to download HP drivers,Dell drivers,Acer drivers and now am going to be sharing with you how to download Toshiba drivers, especially for your laptops. Firstly I like to let you know that when ever you are looking for any driver for any device, the first place to check is the device manufacturers website. Don’t be deceived into believing that you will find a better driver outside the manufacturers website. Am not also rulling off the fact that you can get drivers from other site.
In this article I will be showing you step by step guid on how to download Toshiba drivers from Toshiba support website. If you are ready lets go there.
1. go to Toshiba drivers download page http://www.csd.toshiba.com/cgi-bin/tais/support/jsp/home.jsp. when the site opens click on download on the top of the site.
2. if you are downloading drivers for laptop click on laptops when the download page opens.
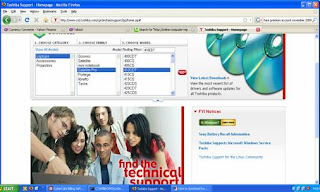
3. select the category in the choose family field,
4. all the models for that category will be listed in the last pane of the search box, select you laptop model in that box and click on Go.
When you click on the GO button, the site will load and display all the drivers for all the operating systems. Now you have to filter the result by some criteria’s like your own installed operating system.
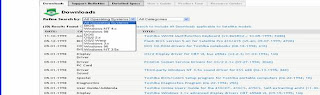

Where you see refine search by, click the drop down list and select your installed operating system. The site will load and display links to all the drivers tof your Toshiba laptop. Just click on each link of the driver you need and it will take you to the download link for that driver, as soon as you have downloaded the driver click on back button on your browser to take you back to the driver list.
Note: to make your search easier you have to know the devices that are in your laptop e.g. does your laptop have a Bluetooth device, wifi etc. this will make your download much easier.

If you follow through this simple steps you should see all the drivers for your laptop,

For more on drivers download please read other articles on how to download drivers for your devices.
youcan ask you question by commenting on the post or send a mail to solutionprovider2000@gmail.com or visit http://online-computer-repairs.blogspot.com. You can subscribe to our feed and stay current with more computer repair articles that will help you keep your computer safe and secured

Sabtu, 28 Maret 2009

How to download HP drivers

A lot of people get very frustrated after formatting their desktop computers and laptops simply because they find it difficult to get the drivers fro their computer especially the laptops. Some have been using the recovery CD that comes with the laptop until it got missing finding where to download driver becomes a very difficult task.
When you format your HP computer there is no need looking for the driver elsewhere. The manufacturers being HP Hewlett packed knows that you will misplace your recovery CD and have placed all the drivers for their computers on their website for you to download when ever you need it.

To download HP drivers you must know the computer model and the operating system installed before you start looking for the driver.
Start by going to www.hp.com, on the home page click on support and driver at the middle top of the page, after loading step one is to select software and drivers download. I will advice you to do your search by categories. If you are looking for hp laptop drivers, under product category click on Notebooks & Tablet PCs. on the next page that will load click Notebook PCs, the page will load and display several hp laptop model, if you are looking Hp pavilion dv 600 drivers you will now click on HP Pavilion Notebook PCs, the page will load and display several pavilion notebook PCs, because am looking for dv 6000 driver I will click on HP Pavilion dv6000 Entertainment Notebook PC series, this will load and display all the dv 6000 series notebook links I will simply click on HP Pavilion dv6000 CTO Notebook PC, when the page loads click on Software & Driver downloads , this will now take you to the page where you will select the operating system that is installed on your computer. finally the drivers will be displayed for you to download. Dont get confused because its many the most important drivers are sound, VGA and network controllers.

hope this solves your problem. For more on driver download visit our driver category or subscribe to our feeds for more comprehensive articles on how to keep your computer and network safe and secured.

Selasa, 10 Maret 2009

How to download DELL drivers

A lot of times getting the right driver for laptops is very difficult especially when you don’t have the recovery CD. Some times this is the reason why we don’t want to format the computer even when it needs to be formatted. If you’ve formatted your DELL computer especially laptops and don’t know how to get the drivers. As you read along you will find that out.

Firstly you should know that every manufacturer also manufactures spare parts and drivers that should work with their product so the one place to look for DELL drivers is on DELL website.

Step by step

To download dell drivers you should know the model of the DELL computer that you have. logon to www.dell.com, click on drivers and support, at the bottom of the page, it will take you to a page where you have to identify you product, for this article I will use the model to locate Dell Vostro 1500 windows xp driver, you can use the service tag if you have it pasted on your computer. on the drivers and download page click on select model, it will show different product family e.g. laptops, desktops etc. for this article I will click on laptops, under the product line you will select you kind of product e.g. inspiron, vostro, xps etc, for me I will click on vostro laptops, under the model you will select the exert model of your computer. for me I will click on 1500, finally click on confirm.
After you have clicked confirm the page will load and displays your selection and there you have to select the operating system that is installed on your computer, for me under operating system I will select windows xp, then under importance I will select recommended then the page will load and display all the recommended drivers for Dell Vostro 1500 windows xp, finally just click on the + sign to show the different drivers for the model and then download all the drivers that you want.

There is no better place to get a products driver than the manufacturer’s website of service centers.

For more on how to download drivers and windows problems visit http://online-computer-repairs.blogspot.com. You can post your comment and questions, or subscribe to our full feed for more comprehensive articles that will help you keep your computer safe and secured.

Senin, 23 Februari 2009

How to partition your hard drive using FDISK

Have ever seen a computer with one hard drive but when you boot the computer you always see two drives. This is usually done using FDISK. FDISK is a utility that let you partition your hard disk. It is also used to delete a partition

Before you can format your hard drive, you must partition it. Most drives only have a Primary partition, but that partition can be split into an Extended partition which can be further divided into Logical Drives. The C: drive is normally the Primary partition. The logical drives after that can be labeled D: E: F: etc. To partition the drive you'll need a boot disk. This disk (sometimes called a Startup Disk) will contain the FDISK utility. We recommend downloading one from bootdisk.com to match your Operating System, or you can get windows 98 bootable CD. You can use FDISK utility.

Creating Partition

Once the boot disk has been created, insert the disk and reboot. You will eventually wind up at the A:/ prompt. Type FDISK and hit enter. You will be taken to a screen with the following options: or you can use windows 98 bootable CD

1. Create DOS partition or Logical DOS Drive
2. Set active partition
3. Delete Partitions or Logical DOS Drive
4. Display partition information
5. Change current fixed drive

You will choose option one first, then when asked if you want to use the entire amount of space for this you will say Y if you have no intention of partitioning further, or N if you want to create an extended partition (recommended). Your extended partition must take up the remaining space on the disk. You will then be able to create Logical drives.

Your Primary partition should automatically be set as the Active partition. If not, you may need to go to the option 2 to designate it as such.
Keep in mind that there are some restrictions on partition sizes. You may need to partition huge drives into 64 gigs or smaller.

Deleting Partitions

Before creating partitions on older drives, you will have to delete the current partitions. Backup any important data because all data will be lost after deleting a partition. To avoid losing data, you can use non-destructive partitioning software such as Partition Magic--but it's wise to backup just in case.
If you have an NTFS partition on a drive FDISK will not be able to remove it. You'll probably see an error like this NTLDR is missing. Press any key to restart. You can use a utility called delpart.exe to remove the NTFS partition. This is also available at bootdisk.com.

Hard Drive Utilities

Most hard drive manufacturers include partitioning and copying software with the new drives. This will be a disk similar to a boot disk that will provide a graphical interface that walks you through the process of transferring files from one drive to another and partitioning the new disk into the FAT 32 or NTFS format. This is by far the easiest way to go. However, it is still recommended that you know the differences between a Primary, Extended and Logical drive.

For more information and question please comment on the post or send a mail to solutionprovider2000@gmail.com or visit http://online-computer-repairs.blogspot.com. You can subscribe to my feed and stay current with more computer repair articles.

How to Troubleshoot a Motherboard

Troubleshooting is a set of procedures that entails using your mental tools to dictate and rectify a fault on the computer system. The motherboard is the one component that connects to every other component on the system. For that reason it’s also one of the hardest to troubleshoot.

Check the power supply

When trying to diagnose a bad motherboard that will not power up, you must first check the power supply. Use a tester to test the voltage of current supplied to the computer. If the power supply and power pack checks out okay make sure you are plugging the computer directly into a working outlet.
Check your ram
The next step to take is to check and make sure that the ram is ok. To do this note that the motherboard comes with two ram banks (slots).insert the ram into the first bank (slot). It is normally labeled bank 0 and bank 1 or bank 1 and bank 2. Whichever way just make sure that it is occupying the first slot. Power your computer, if it does not come up.

Use isolation method

Remove any add-on card. Like network card, sound etc including any IDE device connected to the board like hard disk, CD-ROM drives and any external device like printer, scanner etc. after isolating these components power the motherboard. If it comes up then connect the devices one after the other.

Look For Physical Defects on the Motherboard

Common problems with motherboards are leaking capacitors. Capacitors help regulate voltage and when they fail, they will often budge and leak. Capacitors look like tiny soda cans and there are often several on a motherboard. If you do not see any bad capacitors, lift the computer and give it a gentle shake. Listen for any screws that may have come loose and work their way between the motherboard and case. This can cause a short that prevents the computer from booting.

Check your CMOS battery

If the motherboard still does not come up, the next step is to check the CMOS battery. The CMOS battery is suppose to read 3 volts, if it reads 2.5 it’s still ok, but if reads less than 2.5 volts then the battery needs to be replace. Change the battery with a new one. Then check the CMOS jumper. If it is in pin 2 and 3 that means it is disabled, correct it to pin 1 and 2. If you have done that power computer. If it does not come up.

Check your processor

Finally check if your processor is good. To do this, uninstall the cooling fan and heat sink but leave only the processor connected. Power your computer, it should come up by now.

For more information and question please comment on the post or send a mail to solutionprovider2000@gmail.com or visit http://online-computer-repairs.blogspot.com. You can subscribe to my feed and stay current with more computer repair articles.

Kamis, 05 Februari 2009

My computer is not browsing

Recently a friend brought his laptop to me and complained that the laptop is connected to a network but it is not browsing. On another occasion a laptop was brought to me in my office with the same problem of not browsing, so I thought I should share it with you.
The above cases had different causes and different solution where applied to them. In this article I will be sharing the solutions to make your computer browse.

Firstly you have to check your network adapter from the device manager if it is well assigned. To do that right click on my computer, click properties, click hardware tab, click device manager
If it is not marked with a yellow question mark then it’s well assigned.
Now open your internet explorer, click on file menu you will see work offline in the drop down menu if it’s checked uncheck it.

Then close the internet explorer and open it again. if your computer is still not browsing click on tools menu, and click internet option from the drop down menu. Click on connection tab and click LAN settings if “use a proxy server for you LAN ………”is checked uncheck it. Then check “Automatically dictate settings” and close the LAN setting Window. Back on the internet option window still on connection tab if you use a dial-up network also, you will see it there and click remove to remove it. But if the dial up is what you are using currently don’t remove it. Just select the dialup network and click setting by your right.
On the settings window also make sure that ”use proxy server for this connection…….” Is not checked and also make sure that automatically dictate settings is checked. Click ok and apply. You will get back to internet option window click general tab and delete all the cookies, temporary internet files and browser history. Restart your computer and connect your LAN or the network that you are using. Launch internet explorer and it should browse by now. If it is still not browsing install a registry cleaner and scan your computer to remove junk registry entries when you are through with that restart your computer. Connect to your network your computer will start browsing.

for more free articles on how to solve computer problems and networking tips visit online computer repairs or subscribe to our feeds for current solutions via email.